UNDERSTANDING CATCHLIGHTS

 Catchlights are the lights reflected in a subject’s eyes. I normally use strobes to capture them. Catchlights add life and sparkle, while their absence can result in dull, lifeless images. There are no hard and fast rules, and sometimes you may want dead and lifeless. It’s all about knowing what you want, why you want it and how to create it. But portraits are almost always better with catchlights.
Single vs. multiple catchlights
Regardless of the light source used, the goal remains the same: replicating what exists in nature. In nature, we have only one light source, the sun, and there’s only one. I’m not a fan a multiple catchlights. There are exceptions to this, notably in the studio with certain fashion, cosmetics and beauty lighting applications, so we’ll look at them both ways. While studio lighting is a bit more forgiving in the catchlight department, my preference is still a single catchlight created by an overhead keylight. A single catchlight is more natural looking. Multiple bright lights reflecting in a subject’s eyes screams artificial lighting.
Positioning your catchlights
Catchlights are best positioned in your subject’s eyes at either 10 or 2 o’clock, just like the ideal hand positions on a steering wheel. Use 10 and 2 as your catchlight position guideline. There’s one more position, the one you never learned in driving school but use every day: the 12 o’clock position. You want your catchlights creating crescent shapes at the tops of the eyes. So 10, 2 or 12 are the ideal positions for catchlight reflections in a subject’s eyes. As long as you stick with those three positions, you’ll be on solid ground.
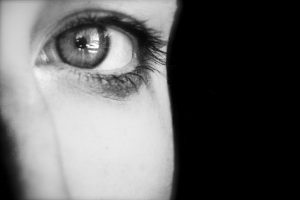 Rarely do you want a catchlight in the lower portion of the eyes, under the retina. This occurs when a light source is placed below the subject’s eye line. We’re attempting to replicate what happens in nature, with light always coming from above. Lighting a subject from below creates a ghoulish effect
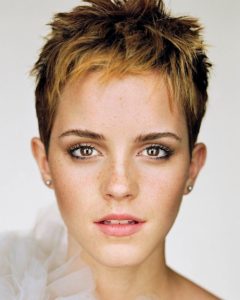 , but there are exceptions to every rule. When you add a second light above that acts as a dominant keylight, you get a pleasing over-and-under effect known as clamshell lighting. I cover other lighting patterns and their catchlights below. In any lighting pattern, any secondary catchlight should be subtle and subordinate to the power and appearance of the keylight.
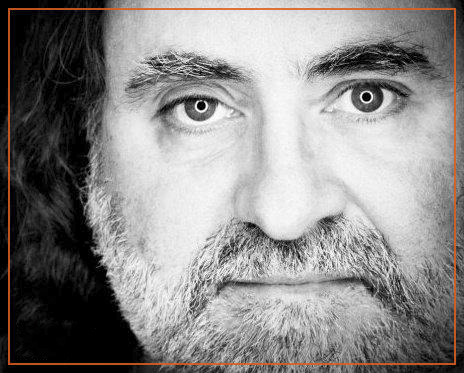
The position of the catchlight reflected in your subject’s eyes is a direct result of the height, angle and position of the keylight in relationship to the subject. The 10, 2 and 12 catchlight positions are created using these classic lighting patterns: Paramount/clamshell light (12 o’clock) and Rembrandt/loop light (10 and 2 o’clock). If you want a catchlight at the 2 o’clock position in your subject’s eyes, move your light to the same position left or right around the circumference of your subject. The same is true for the 12 o’clock position of the catchlight created with Paramount and clamshell light—simply position your light source above your camera positioned directly in front of your subject. To control where the catchlight falls height-wise, raise and lower your keylight until the catchlight is where you want it. For me, that’s a crescent shape at the top of the eyes.
Filling in the shadows
To fill in the shadows on the side of the face opposite the keylight, you’ll need a reflector, which provides subtle fill without distracting secondary catchlights. Reflectors are incredibly flexible despite the fact that they don’t have their own power source or light modifiers. With reflectors, you use distance to control the amount of light they contribute. The closer a reflector is to the subject and keylight, the brighter the fill light. Conversely, the farther away the reflector is from the subject, the less light it contributes. You also have a range of fabrics to choose from that reflect light with different efficiency, intensity and contrast. The basic rule of thumb is white fabric for a softer, more subtle effect and silver when you need more light and contrast.
The ideal catchlight shape is a matter of personal taste and is dictated by the shape of light modifier on your keylight. There are a few modifiers that are perennial favorites based on the more natural-looking catchlight shape they create. Octabanks were invented for this very reason. Their octagonal shape creates a natural-looking reflection in contrast to that of square or rectangular softboxes. The beauty dish is another modifier favored for the circular catchlight it creates. Umbrellas are another option; they don’t provide a lot of control in the way of light spill, but they are a large round ball of light not unlike the sun. Square and rectangular softboxes can be used, but the reflections in your subject’s eyes will mirror those shapes. It’s all about individual preference.
Ring lights
 Ring flash and ring lights are niche lighting tools that are in a category all their own. These lights create a signature doughnut-shaped catchlight dead center in a subject’s eyes. Stylistically, there isn’t much middle ground with ring flash and ring lights; people either love or hate the catchlights they create. I love them.
Catchlights are also useful when you’re trying to decode how an image was lit. They provide telltale clues about the lighting tools and techniques used. You can make educated guesses about what kinds of lights were used, how many were used, how they were modified, what their positions were and how far they were placed from the subject. So when you’re trying to reverse-engineer lighting you see in a magazine or on a movie poster, look to the catchlights.


Comments
Post a Comment