SLASH OF LIGHT: CREATING DRAMA WITH GOBOS
 Inspiration
The most exciting kinds of artificial lighting are those that mimic natural light. It’s not easy to recreate nature’s subtle, atmospheric qualities. Beginners make the common mistake of throwing way too much light at what they’re shooting. Whether you’re shooting people or products, less is more. The more focused the lighting, the more interesting and visually compelling it becomes. If there’s light everywhere, there’s no direction for the viewer’s eye to follow. If there’s a scarcity of light, the areas that are illuminated become the focal point. We see this kind of subtle light in nature.
Lighting geeks like me love nothing more than watching the way sunlight behaves as it streams through a narrow opening, moves across the sky or scatters into beams of light as it breaks through clouds or strikes the leaves of a tree overhead. It results in unique shapes and patterns. These magic lighting moments give me pause and remind me how powerful light and shadow can be in creating mood and atmosphere.
In photography, we recreate these effects using tools known as “go-betweens,” aka “gobos.” These are typically a piece of wood or metal with a series of shapes and/or patterns cut into it. A gobo goes between the light and the subject to cast a shape or pattern onto it. There are also constant lights and strobe modifiers with built-in mechanisms that allow shapes to be created with light and also permit the definition of those shapes to be varied as desired.
Concept
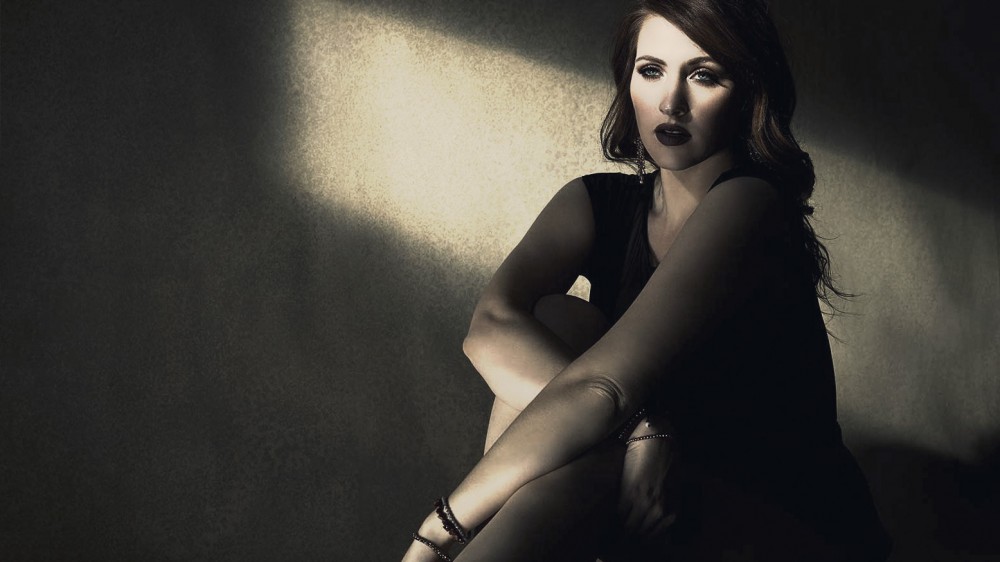
The concept for this “Slash of Light” shoot was the result of a collaboration between local model Laurel Mona and me. We connected via Facebook, where I always post new work, which is a great way to cultivate new relationships with creatives interested in collaborating. Laurel sent over a series of sample images of concepts she was interested in shooting. Several of the images reminded me of a concept I’d been wanting to shoot that was inspired by the striking patterns and shapes created every day on my walls by the afternoon sun streaming through my windows.
This warm, defined, dramatic light changes its shape and angle with each passing hour. We settled on this concept, and over the next few days, Laurel followed up with multiple wardrobe and accessory options. Nailing down many elements before the shoot helps assure everybody is on the same page and working toward the same creative goal.
Styling is a big part of the equation. Ideally, the colours of the background, wardrobe, and hair and makeup should work together to support the overall look and feel of the concept. We chose a warm-toned wardrobe and accessories to help accentuate her auburn hair, a mottled-gold background and the look of afternoon sunlight.
Lighting
One of the best tools for creating shapes with light is Profoto’s Pro Zoom Spot. With this focusable Fresnel and a strobe, you can create a beam of light that you can adjust from zoom to spot and soft to sharp.
Popular Fresnel models are available from Bowens, Elinchrom and several other manufacturers. What differentiates the Pro Zoom Spot from the crowd is its four built-in user-adjustable blades that can create an endless variety of shapes. When you combine this shape-making capability with the Fresnel’s ability to create anything from soft edges all the way to super-crisp shapes, things get really exciting. The Pro Zoom Spot acted as my key-light and is responsible for the slash of light you’re seeing in these images.
The new model, with its built-in 4,800-watt-second strobe, wouldn’t make sense for me at its prohibitive price tag of £8,000. But the legacy model I use, to which you add your own Profoto Pro Head, can be found on eBay for around £300.
I have seen people get close to this effect using a speed-light. In this method, a cardboard tube is attached to the speed-light. At the front of the tube, two strips of gaff tape are used to create a rectangular shape with the light when the flash is fired. Lastolite makes a set of gobos with which you can create shapes and patterns with speed-lights. You won’t achieve the same degree of crispness on the edges of the shape, but they offer a cool, inexpensive way to get close.
The shape created by the Pro Zoom Spot was confined and hard-edged, with no falloff to illuminate Laurel’s body or the background. This resulted in a flat look that lacked separation, layering, and dimension. So I added two fill lights, one at a time, to better judge their contribution.
These additions needed to be extremely low-key or I’d risk destroying the subtle effect created by the key-light. I needed a kiss of light on the backdrop to create separation and bring in its gold tones, and an equally low level of light on Laurel’s body to provide detail and avoid everything falling into black.
To illuminate the background, I used a Profoto B1 500-watt-second strobe with a 20-degree grid spot. This created a subtle circle of light on the background, providing the separation needed to create more depth in the images.
To add detail to Laurel’s body, I added a second Profoto B1 500-watt-second strobe modified with an Elinchrom 14 x 35 strip box. I varied the strip box’s height and horizontal and vertical orientation for ground and standing poses and positioned the fill lights. For the tighter portraits, I used the gridded strobe camera left as a hair light and angled the strip box slightly toward the backdrop to maintain separation.
Retouching
Word to the wise: This is not a forgiving style of lighting like clamshell, which we might use when shooting beauty and portrait work. This light has much harder qualities that accentuate every line and blemish. Expect retouching to be more laborious and time-consuming, but the payoff is beautiful dramatic images. For retouching, I used my go-to Beauty Retouch Panel by Retouching Academy, an inexpensive Photoshop plugin that takes care of many of the repetitive tasks required in retouching.


Comments
Post a Comment